I'm telling you stream crossers, I am a rather avid reader. Maybe not as much in recent years as I used to in University, but I still enjoy a good book.
I remember getting on the subway and having a solid 30-40 minutes of reading, both ways. I would pour through Dragonlance novels in two weeks, if not faster. Alas, once I started driving to work, my reading time evaporated (I work too far to take the bus).
Currently I am reading the Harry Potter series off of my Palm Tungsten E. The text is perfectly readable, and with the right piece of software, I can actually correct the book as I go along. However, the screen is rather small, and the battery life leaves something to be desired. I think I can get about 1-1/2 hours of reading on a full charge.
I decided to go about looking for new alternatives, and what I discovered was encouraging in features and disappointing in prices at the same time.
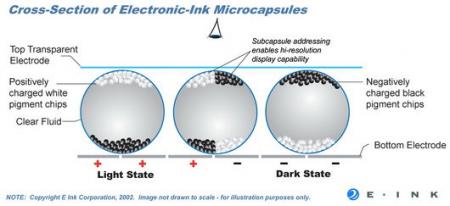
Almost all current ebooks use what is known as e-Ink, as their screen. It is a technology developed at MIT that uses small spheres packed with white and black pigments to display items on screen. The two pigments have a positive or a negative charge. Electrodes under each sphere generate a charge to push one pigment up and pull the other down, changing the colour of the sphere. (see photo below)
Reading-wise, this material really simulates paper. Since it is not backlit, you do need proper lighting to read it in the dark or poor lighting conditions (ie. a book light) just like a real book.
The advantage of this is that power is only consumed to change the display, allowing you to read at your leisure. Power consumption is measured by page turns, not hours.
Another thing I found is that most support PDF and plain text documents... and, of course, their own personal proprietary format for selling you books.
This didn't interest me very much, as there are enough books available out there on Project Gutenberg that I didn't need to buy books anyway. More on that site in my next posting.
Most ebooks also had memory card slots built in so you could load your favourite ebooks on your own without installing fancy software.
Three devices that repeatedly jumped out at me were the following:
There are others, but these are the big boys of the ebook world.
The best (and most expensive) is the iRex iLiad. It boasts the biggest screen (8.1 inch diagonal), Wi-Fi and wired lan, USB port, touch sensitivity (only works with the included stylus), and Compact Flash storage slot. It also has an MMC slot, but it won't work with SD cards. This device is almost a laptop, but not quite. Since it has a heart of Linux, it can run software specifically written for it. It supports the following formats PDF / HTML / TXT / JPG / BMP/ PNG / PRC (Mobipocket). It has a headphone jack, but its website doesn't specify what audio formats it supports. Book reading is just one of its uses since it has a touch screen, but at $700, if you are just looking for a book reading device, look elsewhere.
Then there is the Amazon Kindle. It is a smaller, more dedicated device with a 6 inch screen. This device has a keyboard built in. It also has a USB port and an SD card slot. It does not have Wi-Fi connectivity, but a built in cellular modem, which probably requires a subscription service. Since it is highly tied into Amazon's book sales business, its file support is pretty piss poor. It supports only text, HTML, unprotected Mobipocket. PDF is not fully supported. Other formats are only supported through conversion to the reader's native AZW format. It also supports MP3's and Audible's audio book format (.aa). At $400, I would have expected better file support.
Finally there is the SONY Reader. Normally, I loath SONY, but then they pull shit like this and make a device I just LOOOOOOOOVE! SONY's device has the same size screen as the Kindle, but without a keyboard, so the overall device is smaller. It supports Memory Stick Pro Duo (of course) and SD Cards (wow, surprise to me!). It has no Wi-Fi or lan connection. Books are transferred via USB to the device or memory card. You may be able to use a card reader to put books onto the card, I don't know yet. It supports PDF, TXT, RTF and its own BBeB format. DOC format only supported by conversion to RTF by the SONY software, but you have to have Microsoft Office installed first. It also supports JPEG, GIF (not animated), PNG, and BMP (all images displayed in greyscale). It maily supports Windows, but the latest model can be mounted as a drive in Mac OSX and Linux to transfer files. The Canadian website even has PDF instructions on how to produce optimally sized PDF's using various word processors. It also supports MP3 and unprotected AAC files for audio books or listening to music while you read. At $300 it is the least expensive of the three, but it is still pricey.
Personally, my recommendation is to stay with a regular book for now. $300 is crazy, and the others are off their rocker! I'm hoping that SONY will eventually knock the price to about $150, but I would probably be elected President of the World before that happens. Before the price goes down, they'll just add a new feature and keep the price at $300. So I'm predicting that at least for the time being, I won't be getting an ebook. I'm not some loony, early adopter. I'm not going to pay a premium just to have the price drop in six months *cough* iPhone *cough* Losers *cough* Ahem...
So this is Soundwave on board the Nemesis, signing off for now!
"bah weep graaagnah wheep ni ni bong"
Tuesday, April 22, 2008
A Library in Your Pocket, the eBook

Saturday, March 22, 2008
Simple Request to all Stream Crossers
Hello Stream Crossers!
For a blog of my small size, I do eventually get my share of comments. I love each and every one of them. So far they have all been positive, but I think I would even appreciate constructive negative ones.
However, I have been noticing a lack of originality when posting. Simply put, many are just posting as "Anonymous". While that is ok, it would be nice to see a little personality and pizazz in you handles.
Of course, you do not need to use your real name. Nor do you even have to sign up for a Blogger account. Blogger lets you use any name you want, without having to commit or submit any personal information.
So send that feedback, post a comment, and come up with a good name to post by. After all you are human, and your post name should reflect your humanity and personality.
"bah weep graaagnah wheep ni ni bong"
Saturday, March 8, 2008
PSP: UMD Ripping
How to Copy Your UMD Game to Your PC
Well Stream Crossers, I think that I have touched on a new source of inspiration: PSP Hacking.
Today I will be teaching you how to rip your UMD games to your hard drive as a backup or for playing off of your Memory Stick.
Why would you want to do that? First of all, reading the Memory Stick is much more energy efficient than spinning a disk and firing a laser, so your battery life goes up. Secondly, it helps you to prevent damage to your games by leaving them in their boxes, safe and sound.
Edited 2009-02-07: "USB Special System Storage" is no longer used since the fuctionality to mount the UMD as a drive in Windows is now built in to the firmware.
So here we go:
1) Fully shutdown your PSP by holding the power button in the off position. Then turn it back on.
2) Hold down the L & R buttons as it powers up. You will be presented with a screen with white and red writing.
3) Go to "Configuration" and press X.
4) Under "Use VshMenu" make sure it is Enabled. If not, press the down arrow until this line is highlighted red, and press X.
5) Now go to "Back" and press X.
6) On the main screen, select "Exit" and press X. Your PSP will start up as normal.
7) Now put in the "UMD" you want to rip into your PSP.
8) Press the select button to bring up the "M33 VSH MENU".
9) Now go down to "UMD DEVICE" and press right to change "Memory Stick" to "UMD Disc".
10) Press SELECT to close the menu.
11) Now connect the PSP to your computer, and start the USB Connection.
12) Now go to "My Computer" and open up the PSP drive.
13) Now you should see your game.
14) Now copy your game to anywhere you want on your Computer. - (E.x. "Desktop")
15) Now your rip is being made.
16) When it is done, disconnect your PSP, then press the select button to bring up the "M33 VSH MENU" and switch "UMD Disc" back to "Memory Stick".
Please note that this is a 100% copy of the game. It may come out to be very huge. I'm sure that there are programs out there that will allow you to remove content and compress the file down to something much smaller. Be careful, if you remove too many components from the game, it may no longer function.
"bah weep graaagnah wheep ni ni bong"
Sunday, March 2, 2008
PSP: Pandora's Battery
How to load a custom firmware on your Sony PSP
These instructions are quite old. Click here for more up to date instructions that work on any Operating System!
While I am no fan of Sony, I have to admit that the PSP has amazing potential. But only a fraction of that potential can be realized out of the box.
My brother purchased a PSP (the original black "Phat" as opposed to the current thin "Slim" version) and it wasn't long before realizing that building a decent library of games would cost a small fortune. So I searched the far reaches of the internet to amass the knowledge that I am going to divulge to you right here.
In order to convert the PSP's internal operating system (the 'firmware') you must start with a PSP that already has its firmware updated to 'custom firmware'. This 'custom firmware' is a patched version of Sony's official firmware that unlocks many of the restrictions of the offical version. This includes playing copies of games off the Memory Stick.
To flash the firmware to custom firmware we are going to perform a trick known as Pandora's Battery. The battery's serial number will be temporarily rewritten in order to put the PSP into service mode. Then it boots off of the memory stick and initializes the rewriting.
To perform this, you need the following:
Step 1: Backup your memory stick, get the firmwares, install the 1.50 kernel in the SOURCE.(Revised March 7)
Charge your battery until it is 100%. You cannot run out of power during the process of writing the firmware.
Copy everything you want to keep on you memory stick to your hard drive as we will be formatting the card during this tutorial to make it bootable.
Download all the software to your "My Documents" folder.
Download all the firmwares to your "My Documents" folder. Extract them one by one and rename them as 150.PBP, 340.PBP, 380.PBP, and 390.PBP.
Download the 1.5 Kernel Addon for your version of the Custom Firmware. Connect the SOURCE PSP to the computer in USB mode. Uncompress the contents to /PSP/GAME, then disconnect the PSP and run the 1.50 kernel installer.
Step 2: Install Microsoft .net 2.0
Pandora's GUI will not install or run without it.
Step 3: Install Pandora's GUI
Following the Ultimate Pandora link above will get you the file "14885_Pandora_sUltimateMagicStickv2.rar". Double click on it and double click on "Pandoras_GUI_v1.5.rar" in the new window that opens. Then copy the "Pandoras_GUI_v1.5" folder to your desktop.
Go into the folder and double click on "Setup Pandora's GUI.msi" to install the software. When complete, an icon will appear on your desktop.
Step 4: Prep your Memory Stick with Pandora's GUI
Put your memory stick and fully charged battery in to the SOURCE PSP. Connect the PSP to the computer via USB so it appears as a drive.
Double click Pandora's GUI to run it. It will start on the "Pandoras Battery" tab.
Click on "Load local file" and locate 150.PBP, and hit OPEN.
Under PSP Memorycard, change this to match the drive letter of your PSP while connected to the computer. Use "My Computer" to verify the letter. Change the target folder to PSP/GAME150.
Click on "Format My PSP" when done, disconnect your PSP, remove the card, hold the power button on off until it shuts down. Don't shut down Pandora's GUI.
Put the card back in, power up the PSP, and connect it via USB again. Go back to Pandora's GUI and click on "Copy Files".
When done, disconnect your PSP, remove the card, hold the power button on off until it shuts down.GUI. Put the card back in and power up the PSP.
On your PSP go to GAMES > MEMEORY STICK. You will see four items, "Pandora's Battery Creator", "Pandora's Battery Firm. Installer", and two corrupt files. This is OK, don't delete anything.
Go to the installer and press X to run it. When complete it will bring you back to the main PSP Screen.
Reconnect your PSP in USB mode. In Pandora's GUI, click on "Write IPL".
When complete, close Pandora's GUI. Keep the PSP connected in USB mode.
Step 5: Copy the additional files and folders to the memory stick
Copy 150.PBP, 340.PBP, 380.PBP to the root of the Memory Stick.
Double click on "despertar_cementerio4.rar" and copy the "despertar_cementerio" folder to your memory stick in PSP > GAME.
Double click "390m33_2.rar" and copy the UPDATE folder to your memory stick in PSP > GAME. Copy the 390.PBP firmware to your memory stick in PSP > GAME > UPDATE.
Step 6: Create a "Magic Memory Stick"
Disconnect your PSP. Under GAMES > MEMEORY STICK, run "Despertar del Cementerio". Once complete it will bring you back to the main screen.
Step 7: Create Padora's Battery
Remember, if your SOURCE PSP is a PSP Slim and the TARGET PSP is a Phat PSP, put the Phat PSP battery in before doing this step. Why? It will work with both batteries but the Slim battery only fits properly into a PSP Slim, it simply will not make proper electrical contact in a PSP Phat. Thus, Step 8 will not work.
The Phat PSP battery will make proper electrical contact in both kinds of devices.
If both the SOURCE and TARGET PSP's are Slim, then you are OK.
Under GAMES > MEMEORY STICK, run Pandora's Battery Creator.
When the select screen comes up, press triangle to backup your battery info. This is important so we can restore it later. The program will exit.
Run Pandora's Battery Creator but this time press "X" to rewrite the battery's serial number. The program will exit when done.
You now have what is known as a "JigKick Battery".
Step 8: Flash to the 3.80 Custom Firmware.
Now remove the battery and Memory Stick from the TARGET PSP.
Put the "Magic Memory Stick" into the TARGET PSP first, before the battery.
Now put the Pandora's Battery into the TARGET PSP. The unit will turn on automatically, go into service mode, and boot from the Memory Stick (that is why the Memory Stick had to go in first).
You will now be presented with four options. Simply press "X" to install 3.80 M33, the custom firmware. The install process will take up to 10 minutes. Put the TARGET PSP down and let it run through. It will either restart on its own or prompt you to press a key. Press the key it asks for.
Step 9: Upgrade to 3.90 M33-2
After the unit restarts, go to GAMES > MEMORY STICK.
Run the "PSP Update ver 3.90". Some text will display and then the official Sony Installer will begin. This is OK. Follow the on-screen prompts and let it install the update.
When it is complete, CONGRATULATIONS!!! You now have a fully modified PSP running custom firmware.
Step 10: Switch the battery back to normal
If you have other batteries, and wish to keep this in Pandora Mode, then skip this step.
Otherwise power down the PSP, remove the Pandora's Battery and connect the A/C Adaptor and plug it in.
Now power on the PSP. When it is fully started, put the Pandora's Battery back in. Since the PSP if fully on, it won't go into Service Mode.
Go to GAMES > MEMEORY STICK, and run Pandora's Battery Creator. If you backed up your battery in Step 7, press the L + R buttons at the same time. This will rewrite the original serial number to the battery.
If you did not back up the serial, press the square button to write a generic serial number instead.
Now your battery will function as normal.
Step 11: Prepare to play copied games
Keep the Memory Stick in a safe place if you intend to unlock more PSP's otherwise go to SETTINGS > SYSTEM SETTINGS > FORMAT MEMORY STICK. Then copy your backed up files from Step 1 back onto the card.
Press SELECT. An on screen menu will appear. Highlight "UMD ISO MODE" and press the right direction key until "M33 driver" appears. Then highlight "EXIT" and press "X".
Copied PSP games have an *.iso or *.cso file name. Simply create an ISO folder in the root of the Memory Stick and save the games there.
They will appear under GAMES > MEMORY STICK
If the system can't see any games in the ISO directory, copy the entire contents of the Memory Stick to a temporary folder and format the Memory Stick, then copy your stuff back to the Memory Stick again.
Well that's it. Its alot of work, but is definately worth every minute.
Until next time, keep on having fun!
"bah weep graaagnah wheep ni ni bong"